The spin
cycle: I prefer to
spin fine singles. It gives me the biggest entertainment value for my buck
since it takes longer to spin. If I want a heavier yarn, I can always 3 ply.
For this project, I have decided to aim for a sport/worsted weight 2 ply yarn.
I figure it should be a happy medium where most of the fibers should show well.
I would like them all similar weight for best tactile comparison, coz heck,
after doing all this work, I will take it to Guild demonstrations and events we
participate in the community and anywhere else
where I can create a Segway in the conversation. A lot of spinners (Well
I hear them everywhere) lament their lack of ability to spin anything other
than fine yarn the longer they spin. Not so. It means that you have found you
comfort zone or default. Now you need to make your wheel work for you. Adjust
those pulleys, whorls, brake bands and tensions and spin at that default
comfort zone and you will be surprised how you can spin absolutely any weight
you choose. Think smaller whorl for smaller yarn, thicker whorl or pulley for
thicker yarn.
So…worsted
it is. I have my 20g of fiber and I spin it up onto my bobbin…all of it save a
wee tuft for my binder. 20g at this weight will give you an easily manageable
amount to work with.
 I now
release my brake band and wind the single onto my ball winder. Without it
coming off the leader, I carefully take the yarn off the ball winder, holding
on to the inside end. I tie this end to the leader, ready to make a 2 ply
working from both the inside and outside of the ball.
I now
release my brake band and wind the single onto my ball winder. Without it
coming off the leader, I carefully take the yarn off the ball winder, holding
on to the inside end. I tie this end to the leader, ready to make a 2 ply
working from both the inside and outside of the ball.
Tighten
up your brake band and start your plying. The first few times may take a bit of
juggling but go slow and observe just how the single comes off the ball. This will
help you decide the most comfortable and effective way to hold the ball. I have
heard some spinners put their thumb into the middle of the ball but I tend to
have the inside leader coming on the right (away from my body) and the outside
coming easily and untangled off the left (nearest my body). 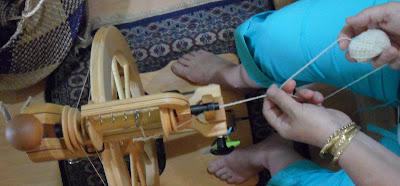

Once plied,
loosen the brake band again and wind onto a niddy noddy. Secure the skein in
several places and you are done!
Wash Cycle: I didn’t really want to wash every
skein separately and I’m not quite ready for a blindfolded sheep breed test so
I needed a solution to washing several skins at once.
The solution
came in the form of wee plastic bread bag locks. I’m not sure if it is just an Aussie
thing or the generation I was raised as in recycling before it was even called
recycling. I didn’t know about landfills and such, only that a lot of items
have awesome uses for other than what they were originally designed. One of my first jobs where I actualy got
paid, was teaching to make paper plate puppets. They were even in an
exhibition. Forget thinking outside the box; why even think it a box in the
first place I won’t hop onto my soap box but it gives me great satisfaction to
repurpose items. Recently my friend Judith from Ontario took our guild by storm
with her shopping bags woven from cut up bread bags. Having worked in a
commercial kitchen the bread bags drove me to distraction…or concentration to
seek a solution. I knit and crocheted them into bags and had a little
production of the Care facility residents doing the same. They took a long time. Jim Crocce, I have a
few verses I’d like to add if I could Find time in a Bottle. Anyway, the woven ones were speedy and it was
great to supply the whole guild with bags. The craze even took over my husband,
inspiring him to learn to weave. The bread bag conundrum has been solved with a
new purpose for the bag locks.

With an
indelible ink pen, I write the breed on the lock and clip it to the skein. If
you have enough of these tags you can also lock it around your wee fleece sample
until you are ready to put it in a binder. If you don’t have enough or any of
these bread bag locks, drop me a message and I would be happy to send you an
envelope full. Now you can soak all your skeins together. The tags won’t fall
off nor does writing rub off.
The Rinse
Cycle: After a 20
minute soak in Eucalan, or non-enzyme dish detergent for yarns that were [1]spun
in the grease, I gently squeeze the water from the skeins. Next destination is outside to the patio on
my concrete step where I thwack the living daylights out of each skein, maybe 2
at a time, moving the skein 1/8 turn until I have worked my way around the
whole skein. This sets the twist. With my hands on the inside of the skein, I
snap my hands outwards. This pretty much is my washing process though I have
heard of others partaking of the “helicoptering” step. I will admit that I have
never even tried this as the visual of the skein flying off my finger as I
twirl it, heading over the fence to lasso the aerial of a passing car, down the
street and far away is a vision too vivid to ignore.
 The drying
cycle: is the final
step, before the displaying the fruits of your labour. I bought this fantastic
round, covered skein/fleece drying rack. I can only guess that spinning is a
very popular art as these dryers are everywhere. They come in all kinds of sizes, number of
drying ribs, and coordinating fabric covers. They keep the yarns safe from the
elements and marauding packs of chickadees looking for readymade nest walls.
They are dual purpose and also serve to provide shade in my garden. My husband calls
my drying rack a garden umbrella. Huh.
The drying
cycle: is the final
step, before the displaying the fruits of your labour. I bought this fantastic
round, covered skein/fleece drying rack. I can only guess that spinning is a
very popular art as these dryers are everywhere. They come in all kinds of sizes, number of
drying ribs, and coordinating fabric covers. They keep the yarns safe from the
elements and marauding packs of chickadees looking for readymade nest walls.
They are dual purpose and also serve to provide shade in my garden. My husband calls
my drying rack a garden umbrella. Huh.
[1]
Fleece that has not been scoured of all its lanolin or grease before spinning
is called spinning in the grease. It is just lovely on your hands.
No comments:
Post a Comment